Introduction to CDC Motorbike Practical Lesson 7
One of the members (W E) in CDC telegram group have kindly contributed a video for the test route in CDC Motorbike Practical Lesson 7. Below is the Youtube video for your reference.
Innoex from CDC learner community Telegram Group chat has kindly contributed the picture below for route 7. If you find this helpful, please do thanks him for his contribution.
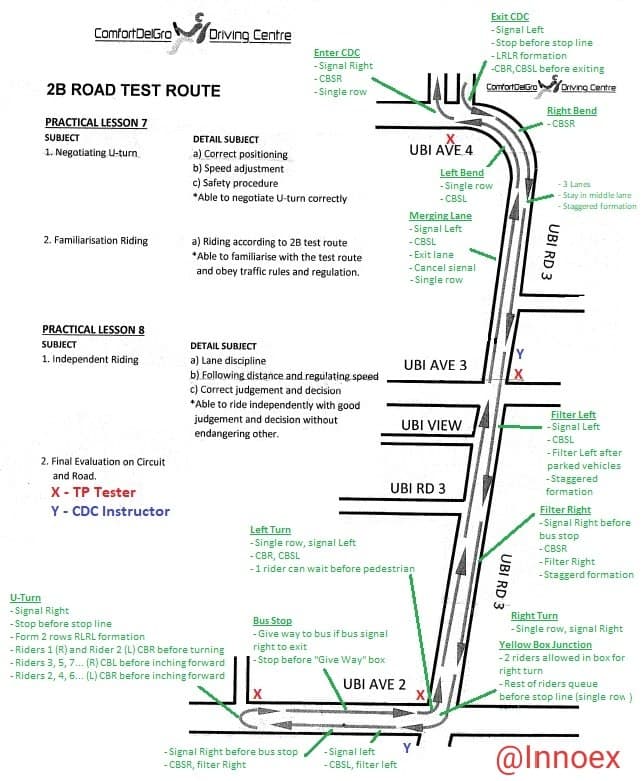
There will be 2 routes for CDC Motorbike Practical Lesson 7. The instructor will bring you out for both route 1 and route 2. After that, it will be assessment round. So you will only be riding 3 rounds outside during CDC Motorbike Practical Lesson 7. During assessment round, it will be 3 – 4 learners riding while the instructor follows behind to assess all the rider. The assessment round will normally be route 1 as it is the route that will be used during Traffic Police test most of the time. Thus, I will be covering only route 1. Please do note that it is possible for the assessment round to be route 2. The lesson description will be quite long but if you dont read it carefully word by word before attending the lesson, you will find it hard to absorb what is being mentioned by the instructors unless you have very good memory. I have divided the route into 6 sections and during the actual traffic police test, there will be a tester present at each section to observe all rider for any mistake.
Please watch the video for CDC test Route one for rough idea on the test route. I have included more text explanation below. Do take note that not all the blind spot checking in the video may not be correct.
CDC Gate
You will start off from CDC gate. Remember to signal right when nearing the gate. There is a stop line at the gate so you MUST STOP AT THE STOP LINE. Failure to do so is immediate failure. Form up two rows. if you are on the right side of the lane, check back left and then check blind spot right before turning right. Otherwise, if you are left side of the lane, check back right before moving off. Please excise your road judgement and ensure that there is a 3 cars length distance for 2 lanes outside CDC gate before moving off. If there is a slow moving traffic outside, you are allowed to inch out your whole bike with the rear wheel in front of the stop line while waiting to move out to the main road. Do remember to do the necessarily check back right or left before inching out.
1st Traffic Light
Once you have turned right, proceed straight. Do remember that the bike formation is 2 rows if you are stopping before the public bike parking on your left. Only after passing by the public bike parking, then the bike formation will be single row. Remember to signal right after passing by public bike parking. Form up 1 row at the traffic light. The traffic light at this junction have only one green arrow. Thus, there are a few scenarios for you to memorize.
If it is Green Light and traffic is clear for you to turn right, check your right blindspot and turn right. If you are not the first rider, do ensure that the first rider has completed half the right turn before you proceed. This is to prevent you from getting struck in between stopline and pedestrian line which is immediate failure as the first rider may just stop for whatever reason.If it is Green Light but traffic is not clear for you to turn right, then you have to inch out such that there are 2 bikes in the junction. The rest of the riders remain behind the stop line. When the traffic is clear, check your right blindspot and turn rightIf the traffic light just turns red, you can proceed to turn right after checking right blindspot. This is because the green arrow will appear after the traffic light turn from green to red.If the traffic light is red, stop behind the stop line in 1 row with right signal light on. When the traffic light turns green, the first 2 bikes will have to inch out into the junction if the traffic is not clear. Otherwise, you can proceed to turn right.
In all cases, please ensure that there is no car turning left before turning right. Remember that the car turning left have the right of way. If you are not the first rider, you should be more caution that you should not follow too closely to the first rider so that you have time and distance to react to the first rider mistake. When inching out into the junction, the second rider should wait behind the stop line for the first rider to give sufficient space so that the second bike can enter the junction. Else, if you follow too closely behind and the first rider did not give space, you will end up in between the stopline and pedestrian line which is immediate failure. Just remember that if you are not first rider, then you should keep some distance so that you have time and distance to react to the mistake made by the front rider.
Zebra Crossing
After turning right, cancel right signal and turn on left signal light. Check left blindspot before filtering to left lane. After that, perform left blindspot check before turning left into a pedestrian crossing. Remember to give way to the pedestrian about to cross the road. FAILURE TO DO SO IS IMMEDIATE FAILURE. While doing so, do check the road condition on the main road. After passing the pedestrian crossing, always position your bike in the middle of the lane. This is to prevent any impatient car from squeezing though you.
This is another difficult part of CDC Motorbike Practical Lesson 7. You have to exercise your road judgement and use your side mirror to gauge whether you can exit from give way line. Remember that you have to ensure that the two lanes are clear before you can move off. Furthermore, if there are cars doing U turning, you have to wait for them to complete their U Turn before you proceed. If you have stopped at the give way line, check back right and then blindspot left before you proceed to enter into the main road. Else, check your left blindspot before you cross the give way.
Once you have crossed the give way line, immediately signal right. Go straight and get ready to filter right again once you pass the chevron marking on your left where the left side of the road lead to KPE. Stay in the lane and continue to move straight until you pass an overhead bridge. This is a reference point for you to filter to another right lane. At this point, you should be at the right most lane and will be preparing to do a U turn. The points stated are just guide for you to change lane. You may have to change earlier or later depending on the traffic condition
U Turn
At the U Turn point, there are a few scenarios again. Do note that the traffic light is with one green arrow. The formation is 2 rows. When moving off, the right side rider have to check back left and the left side rider have to check back right before moving off.
The most straight forward case is the green arrow appears just as you are near to the junction. In this case, you can immediately do a U-Turn at gear 2 and turn into the second rightmost lane.The second case is red light. You will have to form u 2 rows while wait for the traffic light to turn green. The first rider to move off is on the right side. When the traffic turns green with no green arrow, the first rider is supposed inch forward and position the front tyre inside the 2 pedestrian white lines. When traffic is clear, then the first rider can proceed to u turn in gear 1 without crossing the second white pedestrian line.
The rest of the riders have to wait behind the stop line. Best if you can stop until the rider in front of you have completed 75% of the U turn before you proceed. This is because the front rider might make mistake. If you wait a while, you will have time and distance to react to the mistake made by the front rider. In all cases, Please be careful of the car that is entering road from slip road on your left. Though you have the right of way, sometime the car might just cut across to your lane. Thus, you should do the U-Turn slowly and observe the car. Give way if possible.
Big Junction
Continue to stay in this lane and be prepared to filter to the leftmost lane after you ride past a bus stop. At this point, you have completed half of route 1. You will be riding straight and be prepared to slowly filter until you are at the second rightmost lane as you will be preparing to turn right in a large junction. In the large junction, the traffic light is with 1 arrows. This means that you inch out and have to wait in the right turn pocket. The duration of the green arrow is around 7 – 8 cars. So if you are behind 7 – 8 cars, then you can be prepared to ride slowly so that you can stop smoothly when the arrow turn orange. Please do not beat the orange arrow.
Back to CDC
Once you have complete the right turn, you will be back in CDC soon. Remember to signal left before entering CDC. This is last tricky part before you complete your route 1. Once you have turned into CDC, off left signal. Photo below taken from Xavier from Telegram group. Thanks for the photo and explanation.
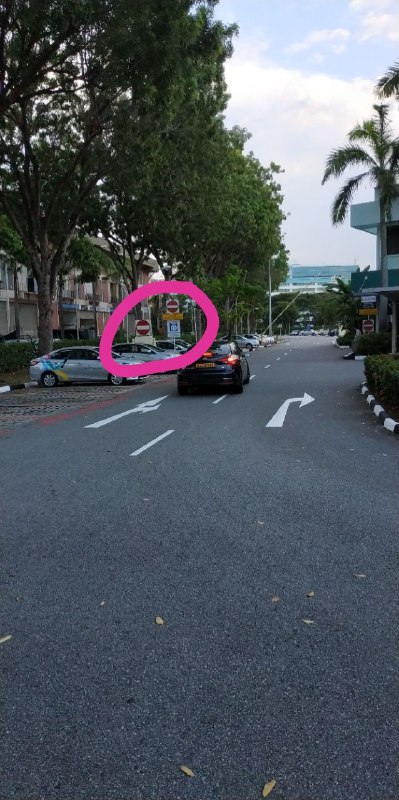
Only after passing no entry sign on your left, then you have to signal right and filter right. After you filter into the right lane, immediately signal left as you will be turning left at the give way line. Remember to check for traffic to be clear before exiting the give way line. After you cross the give way line, you have to signal right immediately because you need to turn right soon to enter the bike nursery. The assessment only stops after you have parked bike at the bike nursery. So do not relax until you have parked your bike.
After parking your bike, the instructor will gather everyone and do an AAR (after action review). Then they will release the result of the test. If you failed, please do not just walk away. Ask the instructor why you failed so that you can avoid making the same mistake again. Do visit this post to learn more about other CDC practical lessons.You can also read this forummer post on CDC Motorbike Practical Lesson 7.
Youtube Video for Route 2 with bus lane in operation for those interested to know more
Route 2 is a backup route in case route 1 cannot be used. This route is seldom used. However, it is possible that the assessment for lesson 7 is route 2, though it is usually route 1 that is used for assessment for CDC Motorbike Practical Lesson 7. This route is longer than route 1 and you have to be aware of bus lane operating hour. If you are taking the lesson during bus lane operating hour, then you have to stay away from the bus lane whenever possible. Do take a look at the youtube to familisarise yourself with this route. Do take note that not all the blind spot checking in the video may not be correct. Route 2 is no longer in use for both lesson 7 and Traffic Police test. Thus, there is no need to read this section.
Pls do try to complete all your theory lessons and tests as soon as possible to prevent any bottlenecking. Both theory and practical lesson can be cleared at the same time. Some learners progress were impeded as they are unable to book their next practical lesson due to not clearing their theory lessons and tests fast enough. Do visit this post to learn more about other CDC practical lessons.
As i am no longer learning in CDC, i might not be able to give the most updated information. Thus, i am forming a telegram group so that i can create a learner community to engage all CDC motorcycle learner whereby you all can share your learning experience and learn from each other. Do join the Telegram group by clicking here. The link is https://t.me/CDCMotorcycleLearner
Telegram is chosen instead of whatapp because it allows user to create username and hide your handphone number. Do consider to install telegram from google app store.
If you have any question or thing that you do not understand, you can contact via telegram or email. For faster response, please contact me via telegram or whatsapp. The QR code is the link to contact me via telegram. Telegram is messaging app for smartphone similar to whatapp.


Hi do i need to pass my internal evaluation before booking prac 7? As i cant seem to book it.
no need. you should call cdc hotline to ask if there is any system error
Hello,
Thanks a lot for the blog, I come and read it before my lessons so I know what to expect.
Just passed yesterday the circuit internal evaluation (lesson 5).
I’m looking for info on lesson 6, the first one on the road, YAY!!
Any information is welcome.
Cheers!
Hello, reading this in advance while I’m currently at lesson 3. Can I ask why is this lesson entirely crossed out, and there’s no article for lesson 6? Thank you
This is because the route has changed completely for lesson 7. Lesson 6 is actually lesson 2 on public road